Okay, I promised I was going to outline my method for scanning film negatives on a normal, run-of-the-mill household scanner. Before I get started, I feel I should mention that if you’re hoping to end up with scans that look like “normal” photos, that’s probably not going to happen by doing them this way. If you have film negatives and you want digital photos that don’t look like sins against nature, and you’re not in the market for a actual negatives scanner, then it’s likely you’ll either need to get prints made and scan them, or get the photos put directly on a CD instead of prints. On the other hand, if sins against nature are right up your alley, read on.
Here’s everything you need to get your scan on:

- A computer with a normal, garden-variety scanner attached. I have an HP1410 printer-combo-thing that I bought for almost nothing several years ago. These are common enough that you may find one on the sidewalk somewhere. Any other scanner you have lying around is fine.
- A canister of processed film negatives. Duh. Now, you can use a roll of negatives that came from your ultra-fancy expensive SLR, but there’s kind of no point in that with a scanning process this homemade. So I say get out and have some fun with a crappy toy camera, or an old vintage camera— something where you’re not expecting the photos to be “good” by any mainstream definition of the word. If you’re going to embrace the lo-fi method of doing things, don’t do it halfway. I used a Smena 6 for my experiment; any Lomo negatives would be great for something like this.
- Some kind of small, portable white light source. The difference between a regular paper scanner and a negatives scanner is that a negatives scanner has a light source that shines through the negative from above, lighting it up so that the image on the negative can be “seen” during the scanning process. If you can come close to duplicating that kind of situation, you can get a pretty decent scan. For my light source, I used my trusty old Palm Tungsten T3, but you can also get decent results with the light from a mobile phone (an iPhone should work great). I’m not sure whether using a yellow light source like a flashlight would work— I can’t think of any reason why it wouldn’t, but I don’t have a flashlight large enough to give it a try (your light source needs to be at least as large as the negative you’re scanning).
The Egyptian Coke bottle and diamond-shaped dish full of Vegas dice are optional unless you want to be completely awesome.
While these are the only things you will need for the actual scanning process, if you want to do anything useful with your scans you will also need some kind of photo editing software that lets you play around with hue, brightness, and so forth, because chances are your scans will look like a big pile of nothing until you mess around with them. I happen to use Photoshop, but I’m sure there are other, less expensive or even freeware options out there if you’re not in the market for an Adobe product.
Step 1: Select your negative

This is pretty self-explanatory, though you might want to be a bit more careful with your negatives than I am. Again, I went as lo-fi as possible for this— expired film, in a mechanical Soviet camera that is almost half a century old.
Step 2: Get your light source ready

My old Palm worked extremely well for this, but you can use your ingenuity to come up with other ideas if you don’t have a Palm. Basically the result you’re going for is a bright screen that’s completely white. I accomplished this by making a perfectly white image file in Photoshop, sending it to the Palm, and viewing the white image in fullscreen at full brightness. I have heard of other people using the Note Pad application, which also gives an almost completely white screen. If you’re using a mobile phone, you might try setting your wallpaper to plain white and see how that works. Try different things.
Step 3: Put everything in place and scan

The rest is just a matter of alignment and timing. The general idea is to get the negative on the scanner glass, and pin it down using the light source. You may have to place a book or something on top of the light source if it doesn’t weigh enough to press the negative flat against the glass. Line everything up as well as you can, but don’t obsess, because you can always straighten out a wonky photo during the post-processing phase. As long as the whole of the negative has light shining through it, you’re good.
I mentioned timing— my Palm has a “convenient” energy-saver function that turns off the display if there’s no input for three minutes. There appears to be no way to turn this feature off. I know that most mobile phones have a similar issue, as well, so the trick is to get the actual scan done while the backlight is at its brightest, before it dims or turns off. The way I did it was by letting the scanner do its preview scan with the Palm turned off, and then when I selected the small area I actually wanted to scan, I turned the Palm on right before I hit the “ok” button for the final scan, doing my best not to move anything while turning on the Palm. That seemed to work okay, but you’ll have to play around with whatever light source you’re using.
As for scanning resolution, I would select the highest available resolution you have, because you are scanning a teeny-tiny thing and expecting to get something that will display at a reasonable screen size, and your equipment isn’t exactly made for the job. My scanner will go up to 4800dpi, and that worked pretty well. I’ve heard of people scanning negatives with a resolution as low as 300dpi, but I tried that and the result was pretty much unusable. Again, experiment with what you have. Maybe you have a better scanner than mine.
Step 4: Post-processing
When you see the results of your scan, your first thought will probably be, wow, that’s really crappy. Yes, it will be until you start messing with it. This is where your photo editing software comes in. I’ll talk in terms of Photoshop because that’s what I know, but you may have a different software suite you can adapt this to.
The first thing you need to do is invert your colours, because duh, you just scanned a negative. The ⌘i keystroke will accomplish this in Photoshop. Then, if you add a brightness/contrast adjustment layer, you can play around with the light. I find that most of my scanned negatives are way too dark (probably because the Palm doesn’t do as good a job of backlighting as a real negative scanner would), so I brighten them up a lot. You get some freaky results by jacking the light up that much, but freaky results are part of the fun.
You may also find that your colours are very, very strange. There are a million ways to adjust colours in Photoshop; I tend to use curves layers and/or colour balance layers. I’ve also been known to do solid colour layers with a soft light blending mode, masked over specific areas of the photo to change the colour of certain items (green for grass, blue for sky, and so forth).
If all of this sounds too complicated, it’s just because I’m explaining it a way that assumes you already know something about adjustment layers. If you need help doing this, a Google search for “Photoshop curves tutorial” or similar should yield you thousands of good, simple tutorials for bending colours around how you want them. Remember that you’ll probably never get a truly realistic look, so just go for something creative and have fun.
It’s up to you whether or not you want to crop the film sprocket holes out of your photo— personally I like them, and as you can see from the examples below, I’ve left mine in for the sake of atmosphere.
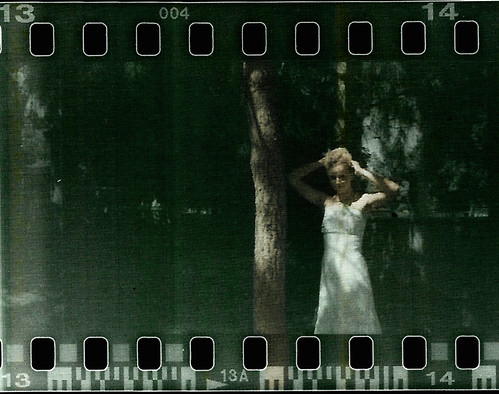
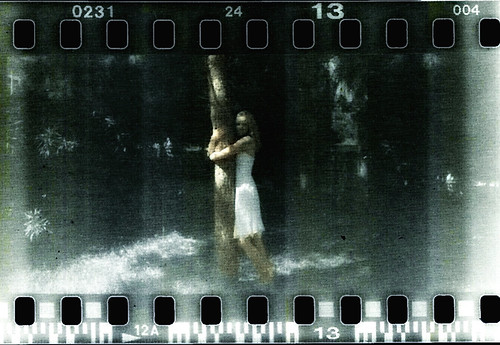

I hope you have some luck (or at least some fun) trying this out— please do link to your results or post them in the comments if you wish.